The Battle of Fort Donelson was fought from February 11–16, 1862, and was part of General U.S. Grants' campaign to clear Confederate forces from Tennessee (https://en.wikipedia.org/wiki/Battle_of_Fort_Donelson). It occurred soon after his victory over Fort Henry on Feb. 6th 1862 (https://en.wikipedia.org/wiki/Battle_of_Fort_Henry), and the successful campaign allowed him to clear most of western Tennessee.
The attack on Fort Henry would have been considered a walk-over except for a lucky hit by one of the fort's 32 pdr smooth-bores. The boiler of the ironclad USS Essex was hit, killing and wounding a number of crewmen, and putting the ship out of action for the rest of the battle and weeks to come.
Fort Henry had a number of problems when the Union squadron attacked. The fort was partially flooded, reducing the gun crews' effectiveness, and the magazines were flooded. Three of the better guns, the 42 pdr.s, had no ammo, and the rest had limited ammo. None of the guns was situated on the commanding bluffs in the area, denying them the ability to use plunging fire.
The Western Gunboat Flotilla under Flag Officer Foote was given the job of silencing the Fort Donalson batteries on the river, and preventing the Confederates from getting reinforcements and supplies by water. Grant would move in with his army and invest the rest of the fort. Foote had four ironclads and two wooden gunboats to attack the river fortifications: USS St. Louis, USS Carondelet, USS Louisville, and USS Pittsburg, and wooden gunboats USS Conestoga and USS Tyler.
The batteries guarding the Cumberland river at Fort Donelson had none of the disadvantages as the ones at Fort Henry. They were well-sited above the river, with two of the three batteries on elevations giving them the ability to use plunging fire.
I used the Yaquinto Ironclads game system for this game, with some modifications. Below is the Fort sheet I created for Fort Donalson for my battle:

Here is the ship sheet for Foote's flagship, the St. Louis. The other three ironclads would be similar, except they all had three 8" Dahlgren smooth bores for their bow guns. The red boxes are hull/casemate armor, the blue boxes are waterline armor, and the green boxes are deck armor. Notice how much weaker the deck armor is than the other areas. One reason you don't want to be subjected to plunging fire:

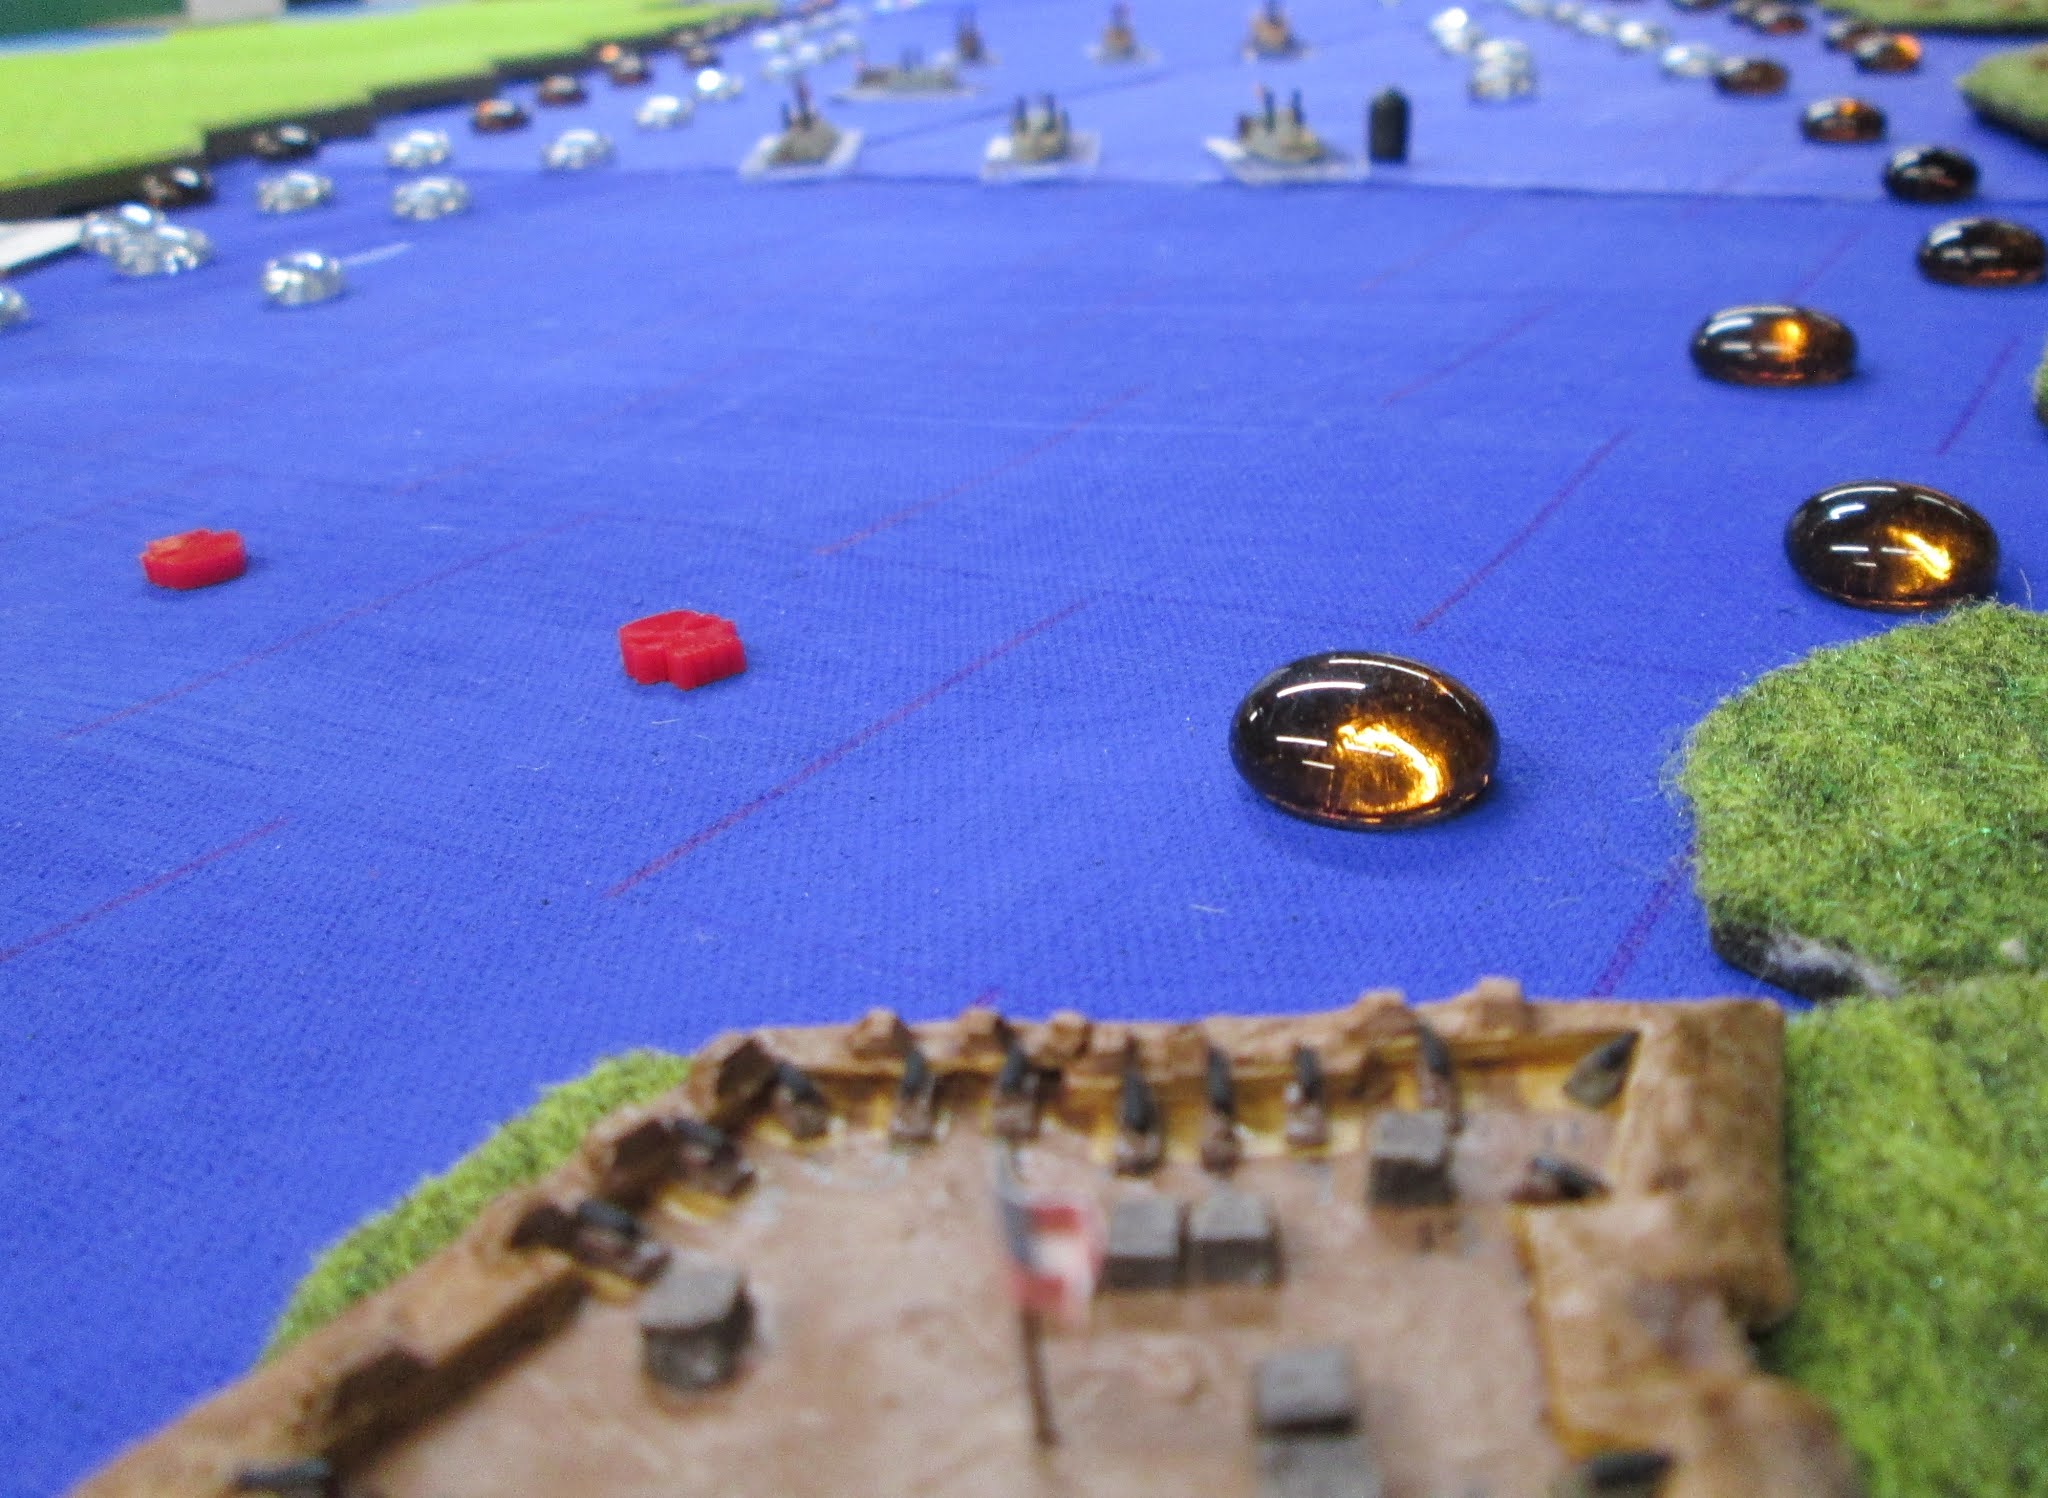
Here is what the battle looks like so far:

The little red markers (they're actually skulls from Littko) mark "possible" torpedo locations. The brown beads are shore hexes, and the clear ones are shoals. You can steam over shoals, but you run the hazard of coming aground. All the ships in the Union squadron had a draft of "1", the shallowest, which means they have less of a chance of coming aground than a vessel with a draft of "2" or "3". Once you take enough hull and or flotation hits though, your draft will increase.


All the ironclad models and flags are Spitheads. The Tyler is from Langston, and I made the Conestoga and the Confederate batteries.
On the first three turns the 32 pdr. smooth bores were out of range for both sides. The Union player decided to close the range with the Confederate water battery and concentrate his fire on it, but not close enough so that the fire from the mid-cliff and high-cliff batteries would be effective. A few hits were scored on the water-battery, but nothing of any real significance. At the range they were firing (11-13 hexes), most of the 8" and 9" Dahlgrens missed. In the real battle Foote came in very close to the Confederate batteries immediately and suffered accordingly. Guess it pays to read the history beforehand.
The Union squadron was fighting upstream against a 2 movement point current, and the St. Louis, the slowest ship in the squadron, only had a top speed of 4 mps, so could only move 2 hexes a turn.
The Confederate player also decided to concentrate his fire on one target, which was the right-most ship from the Confederate point of view, the Carondelet. Some damage was caused by the only guns that could reach, the 8" and 10" Columbiads, as well as the 20 pdr Parrot rifle.
A nasty surprise happened on turn one when the 20 pdr Parrot rifle got a bow deck hit which destroyed most of the deck armor in that section of the Carondelet, as well as causing crew and hull damage. Given that the Confederate batteries were getting a bow rake on the Union vessels, another deck hit would probably hit the same weakened area.
The deck hit was only possible because the 20 pdr Parrot rifle was on the high-cliff battery, allowing it to get a plunging fire hit. Had it been on the water battery, the hit would have been on the bow casemate, which was more heavily armored.
By the end of turn 4 the water battery had lost all the armor on 3 of the 5 gun positions, and about half the crews for the whole battery. The Union player's strategy of staying beyond the effective firing range of the Confederate's 32 pdrs in the Water Battery was working.
 | ||
| Waterspout by the Confederate's current favorite target, Carondelet |
However the 3 larger guns in the Mid-Cliff and High-Cliff batteries were hitting Carondelet consistently, and by the end of the turn about half of her bow casemate armor was gone.
Losing all the armor in a gun position or a ship section is a problem. If a round penetrates your armor, it does extra damage. If you no longer have armor in a section or gun position, ALL hits penetrate automatically and will do extra damage. In addition, if a gun position or a ship section that no longer has armor takes additional armor hits, the hits are assigned to the adjacent sections. It accelerates the process of destruction. This is exactly what was happening to the Water-battery.
By the end of Turn 5 all the armor on the Water-battery was destroyed, 2 guns were knocked-out, and about 60% of the crews were casualties. They failed their morale check, and ceased to play a part in the battle after this. I decided to roll for morale for the Water-Battery separately since they were physically separated from the Mid-Cliff a High-Cliff Batteries.
 | |
| Water-Battery smoking in the distance |

By the end of turn 6 the Carondelet had all the bow casemate armor and bow deck armor gone, and most of the port waterline armor destroyed. It had also taken about 50% hull and crew hits. Keeping it in line risked getting it sunk, so the Union player decided to back it out of the battle line. Fortunately it had taken only 1 flotation hit so far, so was not in immediate risk of sinking. The 2 MP current helped get it out of the line quickly.
 | ||
| Carondelet (on left) backs out of line, while the rest of the Ironclads move up to engage the Mid-Cliff Battery. Tyler and Conestoga stay back because of their "wooden" armor. |
On turn 6 the 32 pdr in the Mid-Cliff Battery was knocked out by a lucky hit. Actually the player was aiming for the 10" Columbiad that was next to it, but in Ironclads if you score a hit on a battery position, there is a chance you will hit the position to the right or left of that position instead. It really didn't matter much as the Union player was staying at the maximum range for the 32 pdrs.
Between turns 7 through 13 it was a pounding match between the two sides, with the Confederates getting the worse of it because of the Union heavier weight in guns, and the Union player's decision to not close so that the Confederate 32 pdrs could be effective. The Confederates switched their attention to the next ship in line, the Louisville.

Finally on turn 13 the Union player managed to knock out the Confederate's best gun, the 10" Columbiad in the Mid-Cliff Battery. This left only the 3 guns in the High-Cliff Battery.
 |
| Only the 3 guns in the High-Cliff battery are left at this point. |
 |
| Timberclad Conestoga (on left) moves into the battle-line. |
The Union player felt that with most of the Confederate guns out of action, it was now safe to move at least one of the Timberclads into the battle line. Plus he needed to take another ironclad out of the front line.
The damage on the Louisville was starting to accumulate (over 50% bow casemate and port bow armor gone, 70% hull damage, almost 50% flotation damage, and 40% crew casualties), and he would need to retire it to soon.
On turn 15 the High-Cliff Battery lost it's 32 pdr. The Union player shot the Conestoga forward so it could use it's full broadsides (3-32 pdrs) against the fort.


By turn 16 the High-Cliff Battery had lost all it's armor on the 32 pdr and 20 pdr Parrott. About half the armor was gone on the best gun the Confederates had left, the 8" Columbiad. Crews were close to being wiped out too.
The Union player backed the Louisville out of line at this point, but also brought the other Timberclad forward (Tyler).

By turn 18 all the Confederate batteries' crews and armor were gone. The Union Player's strategy of using his heavier ordnance (8" and 9" Dahlgrens) at a distance where most of the Confederate guns (32 pdrs) were ineffective paid off.
 | ||
| The Confederate batteries by the end of the game. Not all guns were knocked out. Some just ran out of crews (Cr). "A"is the armor rating. |
The Union player didn't get away without paying a price. Both Carondelet and Louisville would have had to spends weeks getting repaired after this.

What I didn't tell the Union player is that if he got within 5 hexes of the High-Cliff battery, he wouldn't be able to fire at it because the Union guns couldn't elevate that high. His strategy of staying at a distance prevented me from inflicting that on him though.
This pretty much ends the "Historical" part of the battle. In the actual battle the Union squadron took significant damage and had to retreat without putting the Confederate batteries out of action.
==========================================================================
I took advantage of optional forces included in the Ironclad's scenario, by introducing the ironclad CSS Eastport into the game. The Confederate commander had the option to commit it earlier than he did, but held off to allow the shore batteries to inflict as much damage as possible before he did.
The Eastport was a side wheel steamer being converted to an ironclad on the Cumberland River at Cerro Gordo, Tennessee at the time of the battle. It was still incomplete when captured after this battle, and completed by Union forces and incorporated into the Union river flotilla.
This supposes that the Confederates put a lot more effort and organization into getting it finished before the Union forces attacked. Here's what the ship sheet for the Eastport looks like:

Although somewhat formidable on first sight, when comparing it to the Union Ironclads it's not much better. It's armor, speed, and armament are very similar. About the only advantage it has is that it's built as a ram, and even it's ram strength is not that strong (50). The reason the ram value has multiple boxes, is because the ram can take damage too, and be degraded from use or enemy fire.

The Conestoga, which we last saw far out in front of the rest of the squadron, was the first ship to spot and engage the Eastport. Probably this was the worst ship to do so as it had the weakest guns and armor of any vessel in the squadron:
 |
| USS Conestoga's ship sheet |
Conestoga immediately turned 180 degrees to get back to the safety of the main squadron, but the Eastport was already coming up fast (for it) with the help of the current. Shots were exchanged as the range closed, with the Conestoga taking a few hits from Eastport's forward 6.4" Brookes Rifles, but fortunately for Conestoga, there were no critical hits.

The combined Union squadron targeted the Eastport, and soon it was taking hits too.
 |
| The Eastport closing with the Conestoga, but the combined Union squadron wont make it easy or cheap. The captain and pilot of the Eastport know where the gap is in the field of torpedoes...Ramming speed! |
Although the 6.4" Brookes Rifles on the Eastport were good guns, they weren't super-weapons, and only those two bow guns could fire on the Union squadron as it closed. The Union squadron on the other hand had at least 3 guns on every ironclad that was either a 9" or 8" Dahlgren, or 42 pdr Army Rifle. That plus three more 8" Dahlgrens on the Tyler, and five 32 pdrs between the Tyler and Conestoga, and you have a lot of lead flying at the Eastport.
Before the Eastport crossed the line of torpedoes (and going through the gap left in them) it took several significant critical hits. At least two hits penetrated the waterline, causing flotation hits. Other hits caused hull, armor, and crew casualties.
The Union player rejected the idea of a wholesale retreat in the face of the on-coming ram. Had he turned away to avoid the Eastport his formation would have dissolved into chaos. The limited maneuvering room would have made it likely there would be a collision between his own ships. He decided the best thing to do was face it and deliver as much fire on it as possible before it closed.
Once through the torpedo line the Eastport selected the Union Player's flagship, the St. Louis as his target. As it closed, the Union player tried to pour on as much fire as possible. With the range closing to point blank it should have been hard to miss, but two of the three bow 8" Dahlgrens on the as yet untouched Pittsburg managed to miss (rolled two snake-eyes in a row). Not a good time for the gunners to get shaky!
The Eastport rammed into the starboard foreship of the St. Louis, which was unfortunate for the St. Louis as the waterline armor in that section was weak (see the ship sheet earlier in the article).

The Eastport's ramming attack did not cause as much damage to the St. Louis as it could have, as the Confederate player rolled the only thing that wouldn't have sunk the St. Louis in one turn. Still it was bad enough. All the flotation except for one box was destroyed. Up to this point St. Louis was relatively untouched. Just shows you how one good ramming attack can change things.
I have to say I really like the job Yaquinto did with the ramming rules. They take into account the speed, mass, and ram strength of the attacking ship, as well as the waterline armor of the rammed ship. Ramming with a large, fast, ram equipped ship can sink many ships in one turn. Conversely, trying to ram a light non-ram into a well-armored ship is a good way to sink yourself. The ramming ship usually takes some damage itself, and can lose it's ram.
The St. Louis got some small compensation for the damage caused to it when it's guns knocked out one of the Eastport's bow 6.4" rifles just before it struck.
The Eastport and the St.Louis were briefly fouled but soon managed to separate. Slowed to the speed of the current, the Eastport drifted in-between the Carondelet and Loisiville, who continued to slam broadsides into it. The Eastport got fouled with the Carondelet too.

While the combined Union squadron pounded the Eastport, the Eastport fired back. The Eastport's two stern 5.8" Banded rifles were trained right on the hapless St.Louis and both scored waterline penetrating hits. When a hit penetrates the waterline, it's an automatic flotation hit. And since St.Louis only had one flotation point left, it was in a sinking state. Ships don't necessarily sink right away in Ironclads. They remain afloat 1 turn for every 10 hull points left for wooden vessels, and 1 turn for every 20 hull points left for armored vessels.
St. Louis had 24 hull points left, so the one turn it had left above water wouldn't have been enough to get to shallow water where it might be recoverable. It would sink in deep water.
In return Eastport lost all but one of it's flotation point. The modifiers this gave to the Eastport's next moral check caused it to fail morale, and it was decided to call the game at this point.

Eastport at the end of the game. Notice the flotation damage circled in red, and the draft that was a 2, is now a 3 (it's draft increased because of the flotation damage).
It would have been hard to rate this as a clear cut Union victory. Although he knocked out all the river batteries, and would have ended up possibly capturing and repairing the Eastport, he lost his flagship, and had two more ironclads out for repair to add to the Essex damaged at Fort Henry.
Please leave a comment and tell me what you thought of the article. Suggestions for improvements always appreciated.
My next battle...the Battle at Plum Point
https://civilwarmonths.com/2017/05/10/the-battle-of-plum-run-bend/