I
created this scenario because of my belief that in most set piece
battles commanders are given far too much information about the
enemy, and their own forces. Many battles were fought without either
commander knowing exactly what the other commander had, or when or if
either would get reinforcements. In many games the reinforcements
are labeled on a track giving both players perfect knowledge about
what's coming, and when. The beginning forces are set out for all to
see. The Fog of War is missing. This scenario was created to give
both players imperfect knowledge of what they could expect as
starting forces, whether they will get reinforcements, and how much.
In
the historical Battle of Edgcote, Pembroke had no idea that Rebel
reinforcements would appear on his flank, and even when they did show
up, it was uncertain what strength they were. He didn't know that a
significant part of his army would never show up. The Rebel / York
commander probably didn't know that part of the Royalist army wasn't
present, or whether it might show up as a reinforcement on his flank.
He didn't expect the reinforcement that showed up for his own side.
I thought this situation especially needed this format, because the
Royalist were in a very bad situation, and the Fog of War would help
them most.
To
play this scenario, both players secretly roll a D6 on the “Edgcote
– Order of Battle” chart for their side. This will tell them
what they start with and what reinforcements they might expect. The
Rebel player always gets all 6 contingents of Fithugh's and Conyer's
battles. It's only Clapham's reinforcements that is the variable for
them.
Then
one player rolls another D6 to determine the starting positions for
both sides as shown on the map. If reinforcements appear, the owning
player rolls another D6 to determine their point of entry.
Reinforcements for York will come in on entry areas Y1-Y6, and
reinforcements for Lancaster will come in on entry areas L1-L6. You
will see that it is entirely possible for enemy force to come in
directly behind you army. Deal with it. For extra variability, roll
a separate die for each reinforcement if reinforcements come in on
different turns.
Some
entry points might be a considerable distance from where the fighting
is happening. I suggest adding an extra turn to their entry onto the
battlefield for every inch of the map they need to travel.
This
scenario was made specifically to play with the “Polaxed 2”
miniatures rules, which are for playing War of the Roses battles.
With some adjustment I'm sure other rules, such as “Hail Ceaser”,
could also work. I'd be interested hearing about your game if you
use this scenario.
I
want to thank the Nothhamptonshire Battlefields Society for their
excellent pamphlet “Edgcote 1469, A Guide for wargamers by Graham
Evens and Richard Lindley.” It was very helpful in preparing this
scenario.
The order of Battle for this was obtained from "The Poleaxed Source Book Volume II" from Freezywater Pub. You can look up the contingent cards that I created for that at boardgamegeek.com, poleaxed-2 in the files section. Since that was published in 2003, I realize subsequent research will probably make that obsolete, and I welcome any corrections. Some of the contingent commandeers I frankly "dart-boarded" as the sourcebook had some of them labeled as "Unknown", which also explains the Captains 1-4 for the independent bowmen contingents.
The Roman squadron emerging from the port of Lapari
The following is an account of a hypothetical naval battle that could have happened between the Roman and Carthaginian fleets during the First Punic War. It is typical of one of the many small scale battles that probably happened during this war.
This was my first game using the Avalon Hill "Trireme" boardgame rules modified for miniatures. There is a "Fleet" set of rules, which are fairly short and involves little paperwork, and a "Ship" set of rules that are more comprehensive. I used the Fleet rules for this battle.
All Roman ships are 1/600 scale models printed out from files from Wargames Vault by Voxhouse. The mat is from Monday Night Productions. Carthaginian ships are Valiant Miniatures.
Legate Otacilius has been given a small squadron to defend the Roman merchant traffic moving through the Lapari Islands (just north of Messina, Sicily). The supplies coming through there are vital to the Roman army's campaign to oust the Carthaginians from Sicily. Lookouts posted on the hills overlooking the harbor have reported strange ships in battle formation coming from the west...they have to be the enemy.
Otacilius sailed in the Cataphract Hepteres (7 men per row of oarers) Beta, the other three ships being Cataphract Quinquiremes (5 men per row). Cataphract means the men at the oars were protected by a wooden wall to the side and ceiling above. Crew quality is rated from Expert - Average - Green - Slave. Slave crews didn't actually exist in this time period, which the rules make clear, but is a useful rating for a truly awful crew, or for a captured ship (who's crew naturally didn't have the highest morale).
Otacilius sailed with all average crews except for the Pi, which had a green crew. All except except Pi were equipped with special equipment to help them grapple another vessel. In order to capture an enemy vessel, first you have to grapple with it before you can board it and fight its marines with your marines.
The Cataphract Quinquireme was the standard battleship for the 1st and 2nd Punic Wars, and the ship ratings were the same for both sides: 4 hexes for full speed, 2 hexes for cruising speed. The Beta, being a larger ship has a 3 for full speed. Every time you use full speed you have to roll to see if your crew tires. Once a crew tires it can only use cruising speed for the rest of the game. There is no recovery. The better the crew, the less chance it will tire when using full speed.
The other ratings the ship have are size (8 for all Quinquiremes, 9 for the Hepteres), and a boarding rating (8 for all Quinquiremes, 16 for the Hepteres).
The Carthaginian admiral Hasdrubal has been given a small well-manned squadron with the objective of disrupting the Roman merchant traffic supporting their armies in Sicily. Although merchant ships are his top priority, he will not pass up the opportunity to embarrass an inferior Roman squadron.
All the Carthaginian ships had "Expert" crews.
The Carthaginian squadron closes with the Roman squadron, which can be seen at top right.
There are three ways to attack an enemy ship in the game:
Ramming, which can result in either crippling or sinking the enemy ship.
Oar Rakes, which can only result in crippling the enemy ship.
Boarding, which requires you to grapple an adjacent ship and fight a boarding battle. This can result in capturing the enemy ship.
As he approached the the Roman Squadron, Hasdrubal has his two columns diverge in order to come at the Romans from two directions.
Commanders in this time period typically either wanted to fight a "Ram/rake" battle, or a "boarding" battle. The Ram/rake battle was typically favored by the side with better crews, while the boarding battle was favored by the side with larger marine contingents and less well trained crews.
Hasdrubal continues with his envelopment while Otacilius waits for inspiration.
Otacilius decides to take a chance on using full speed to close with part of the Carthiginian force when they seem to be too separated to support each other. However in doing so both Pi with it's green crew, and Xi with it's average crew become tired. No more full speed movement for them.
The Carthaginians at the top use full speed to distance themselves from the Roman attack, while the other two use full speed to close in with the Roman rear. It looks like Hasdrubal's strategy is working so far...
Roman ships Beta and Kappa both use full speed to get away from the Carthaginians closing on their rear, but in the process Beta tires its crew.
Carthaginian ship Iota and Alpha use full speed to try to catch up to the fleeing Romans, and manage not to tire their crews. The only real advantage the Carthaginians had in this battle (and the war in general) was their superior crews.
The Roman Pi manages to ram the quarter beam of the Xi, but does no damage to the Carthaginian. It does manage to cripple itself however. Crippled ships can move only 1 hex, and their boarding value is halved. Crippling can be repaired, at the risk of sinking yourself.
Roman Xi does manage to grapple Carthaginian Xi (notice the "grapple" marker between them in the picture).
After an inconclusive boarding battle between the Xi's, Carthaginian Xi manages to break the grapple and use Full speed to get away. Meanwhile Carthaginian Alpha makes a ram attack on Kappa, while Iota does the same to Beta. It looks like the Carthaginian strategy is working, but battle is an iffy thing...
Iota's ram attack does no damage to Beta, but it does give Beta the opportunity to grapple with Iota, which it does successfully. With Beta's larger boarding value (16 to Iota's 8), Iota is in trouble.
Meanwhile Alpha's ram attack on Kappa also yields no positive results, but does allow Kappa to successfully grapple Alpha.
Beta successfully boards and captures Iota (note the red marker). The crews of captured ships revert to "slave" rating, are tired, and crippled. The cripple can be removed. but the other ratings are permanent, even if re-captured by the original owners.
Kappa and Alpha's boarding battle was inconclusive this turn, and if still grappled next turn have to fight again. Meanwhile Omicron has rammed Kappa on the opposite beam hoping to force a decision. Xi has also taken the opportunity to ram Pi.
Meanwhile Roman Xi has taken the opportunity to move around Pi to get adjacent to the immobile Xi.
The disadvantage of ramming is that it stops you in your tracks, and the only move you can make next turn is to backwater (reverse) 1 hex. It leaves the ramming ship very vulnerable for 2 turns. An oar rake on the other hand, allows a ship to potentially cripple another ship, and keep moving. It doesn't have the potential to sink an enemy vessel, but at least you're not locked in place and made an inviting target.
The green "BW" counters on sterns of Xi and Omicron are a reminder the next move they have to make has to be a backwater move.
Roman Pi and Kappa are both crippled by the Carthaginian ram attacks.
Roman Pi and Kappa have both managed to repair this cripple status (very lucky). Kappa has managed to grapple with Alpha again.
Carthaginian Xi backwaters one hex (the only thing it can do), but even the tired Roman rowers are able to catch up to it, and now it has Roman ships on three sides all wanting to grapple and board...
Beta manages to grapple with Carthaginian Xi, and the inevitable happens. Xi may now be a cripple, with a slave, tired crew, but at least it no longer belongs to the enemy!
Kappa has manged to keep grappled with Alpha, and not get captured, allowing its compatriots to come to its aid. Omicron has managed its backwater move, but is now in a dangerous position.
Alpha is also captured, and Hasdrubal in the Omicron uses full speed to make a break from the (mostly) tired Roman crews. However, Kappa's crew had not been tired out yet, and uses full speed to catch up and grapple with Omicron. The crews tire in the process, but the result is worth it as a successful grapple is made.
Another Roman ship manages to grapple with Omicron, and the tired Roman crews get their just reward in another, and final capture. Hasdrubal is escorted in chains to the Beta, and four new ships are added to the Roman fleet.
Summary:
The outcome of this battle was 180 degrees from what I expected when I set it up. I expected the Carthaginians with their expert crew to run rough-shod over the lesser Roman crews, and it looked at one point that it might happen. I think the Carthaginian made a mistake in not doing oar-rakes instead of rams, because of the already mentioned unfortunate results of ramming (stops you dead in the water a turn). I also forgot about the necessity of making a backwater move for the first two rams that happened.
I had a lot of fun fighting this battle. The rules for the Fleet game are only 6 pages long if you add the optional rules, but still have some very clever nuances. It looks relatively easy to incorporate some of the more complex rules from the Ship game into the Fleet game bit by bit to add more realism (the rules even encourage it).
I have created several charts to support this game which can be downloaded from the Board Game Geek site. Just look for the Trireme game from AH and you will find them in the Files section. Let me know what you think! Thanks, and good gaming.
The actual Battle of Memphis occurred on June 6, 1862, and resulted in the almost total annihilation of the Confederate River Defense Fleet at minimal cost to Union forces. It eliminated the last major fleet unit the Confederates had on the Mississippi River (https://en.wikipedia.org/wiki/First_Battle_of_Memphis).
After researching this battle, I realized their were a number of "what-if" variables that could have seriously changed the order of battle and strength of both sides. I also wanted to create a situation where both sides would not have perfect knowledge of what the other side had. The Yaquinto Ironclads scenario I was using for the basis of this game had some omissions and errors. I tried to correct these as much as possible. I especially want to thank Phil Ireson of Spithead Miniatures for letting me use his article for researching the battle.
This game was fought with 1/1200 scale miniatures, mostly Spitheads. I used a slightly modified version of the Yaquinto Ironclads game, converted to miniatures.
Notes
for the scenario:
Four 8” Dahlgren were given to the Confederate
RDF (River Defense Fleet) by the commander of Fort Pillow as it was
being evacuated before the battle. The guns went to the
Thompson, Lovell, Sumter, and Beauregard. However General Thompson
withdrew all the experienced Army artillery crews previously loaned out
to the fleet before the battle. He was in the process of returning
those crews when the Battle of Memphis occurred. All 8” gun crews
fire as “Green” crews. Other gun crews retain their original
rating.
The Union ironclads were over a sandbank that
was deep enough in the river for them to steam over, but too shallow
for the deeper draft Confederate RDF boats. Apparently both sides knew this.
An area around the Union ironclads is designated as a “deep”
shoal. The Union ships (including the rams) can move over it, but
rebel vessels have to roll for grounding.
Certain areas of the river will be designated as
not having a current. Mostly those areas in the “shadow” of the
main current that are behind a bend, but also hexes adjacent to the
river bank.
The Union ironclads had logs suspended along
their waterlines for extra protection against ramming. This reduced
their speed and maneuverability. Increase the waterline armor for
all Union Ironclads by 5 on all sections forramming
calculations only. Reduce the maximum speed of such vessels by
1mp. Turning capacity is 1/1, and Engine capacity is +1, -1, with
no ability to use Emergency Engine Capacity until the logs are
jettisoned. Once an ironclad is rammed, it looses the log
protection for that section. The logs can be jettisoned on a roll of
1-4 on a D6 at the beginning of the turn, and the ship regains its original
top speed and turning capacity.
The Ellet ram fleet and the Union Mississippi River Squadron were under two completely different command structures, and didn't always play nice with each other. Davis, in command of the ironclads, does not seem to have been in recent
communication with Ellet, and was unsure when Ellet's wooden rams would be
arriving. Therefor the Union player will roll every turn to see
when and if the Ellet rams arrive. The rams will not necessarily
all arrive at the same time:
Die roll on
1 D10
Vessels available
1
Queen of the West, Switzerland, Monarch,
Lancaster
Do not roll on subsequent turns
2
Queen of the West, Switzerland, Monarch,
Lancaster
Do not roll on subsequent turns
3
Queen of the West, Switzerland, Monarch,
Lancaster
Do not roll on subsequent turns
4
Queen of the West, Switzerland, Monarch
Do not roll on subsequent turns
5
Queen of the West, Switzerland, Monarch
May roll next turn for any additional boats
6
Queen of the West, Switzerland
May roll next turn for any additional boats
7
Queen of the West
May roll next turn for any additional boats
8
Mingo
May roll next turn for any additional boats
9
Lioness
May roll next turn for any additional boats
10
Mingo and Lioness
May roll next turn for any additional boats
When the rams arrived before the original battle, they tied up
along the river bank rather than joining up with the ironclads. When battle did start, only two of the four rams initially
participated, and one never did. To represent the miscommunication between the two fleets, use the following: When a ship from the ram fleet
arrives, it has to anchor next to the shore to the west of the
ironclads and stay there until “activated.” On the turn after
it anchors, at the beginning of the turn, roll 2D6 for each anchored
ram. In order to activate, a ram has to roll equal to less than the
total of the boat commander's rating, plus crew's morale check
value, plus 2. If a Confederate boat is in sight, add 2 to the
value. If an adjacent ram activates, add 1 to the value. So the
Queen of the West with Col. Ellet (+3), which has a crack crew (MC
value of +2), would activate on a roll of 7 or less (3+2+2) . If a
Confederate boat was in site it would activate on a 9 or less. If a
ram arrives after another ram has already activated, the new arrival is
automatically activated and does not need to anchor or roll for activation.
The Confederate RDF only had enough coal to fight this battle, and
their vessels were doomed unless they won a dramatic victory.
They considered burning their vessels and escaping overland instead of fighting.
Therefor Confederate losses are not a consideration for victory,
only Union losses.
What
if considerations:
Two more Union ironclads were available before the battle, but
were put on guard duty somewhere else. The Mound City and
Pittsburg could have been at the battle if less valuable vessels had
taken their places. On the other hand, additional ironclads might have been withdrawn for guard duty in addition to the Mound City and Pittsburg.
Only one roll is made on this chart.
Die Roll 1D6
Additional ships available or deleted at start
1
Add Mound City and Pittsburg
2
Add Mound City and Pittsburg
3
Add Mound City
4
Add Pittsburg
5
No additional ships available
6
Delete one ironclad from the initial order of
battle.
One or more of the Timberclads (Conestoga, Tyler, Lexington) could possibly
have been made available for this battle. If one
additional ship was received from step 1 above, add one to the die roll. If
two additional ships were received from above, add two to the die
roll. Only one roll is made on this chart.
Die Roll 1D6
Additional ships available
1
Conestoga, Tyler, and Lexington are available at
start
2
Conestoga, Tyler, and Lexington are available
turn 3
3
Conestoga and Tyler are available turn 4
4
Conestoga is available at start
5
No additional ships available.
6
No additional ships available.
There was an abandoned fort next to the river.
What if the Confederates had secretly re-manned it just before the
battle?
Die Roll 1D6
Fort Condition and Armament
1
Fort is manned and armed with 2-42 pdr SB, and
3-32 pdr SB/57
2
Fort is manned and armed with 1-42 pdr SB, and
2-32 pdr SB/57
3
Fort is manned and armed with 2-32 pdr SB/32
4
Fort is unoccupied
5
Fort is unoccupied
6
Fort is unoccupied
If the fort is manned, the Confederate player does
not need to tell the Union player until he actually starts firing.
Each gun has armor values of 6, and a crew of 3, with an average crew.
There were a few batteries prepared on the
bluffs at Memphis. These could have participated in the battle, but
apparently did not. I was unable to find out much on this, so I decided not to pursue it. If you find some good information on this, please let me know
River defense forces from New Orleans had been
in the Memphis area a few months before, but had gone back to New
Orleans, and were destroyed there in April. What if the Confederates
had concluded that the combination of fortifications, and the “soon”
to be completed ironclads Louisiana and Mississippi where enough of
a defense of New Orleans, and allowed some or all of the New Orleans
river defense vessels to remain north? This could have included the
ironclad ram Mananas, and wooden gunboats Webb, McRae, Ivy, Mobile, Oregon,
Pamlico, St. Phillip, Governor Moore, and Stonewall Jackson. Multiple rolls are possible on this chart:
Die Roll 1D10
Additional ships available at start
Ability to roll for more (1D6)
1
Mananas
1-3
2
Webb
1-4
3
McRae
1-4
4
Ivy
1-4
5
Mobile
1-4
6
Oregon
1-4
7
Pamlico
1-5
8
St. Phillip
1-5
9
Jackson
1-5
10 (0)
Governor Moore
1-6
So if the Confederate player's initial roll on a 1D10 is a
“4”, he automatically gets at least the CSS Ivy. If he then
rolls a one through four on a 1D6 for the "Ability to roll for more", he gets to roll another
time with the D10 to get another ship. Once the roll for "Ability to roll for more" is outside of the range, no more ships can be rolled for. The Confederate player will always get at least one additional vessel to add to his forces.
General Thompson does not withdraw the
Confederate army gunners: All RDF vessels with 8” Dahlgrens fire
those guns at the ship's designated crew value.
Variable Intelligence: When using optional
forces, both sides will have intelligence about the other that is
either accurate, totally false, or somewhere in between. The player
will report to the other player what he is allowed to know after
rolling on this chart:
Die Roll on 1D6
Result to be reported to the other player
1 -Accurate
Must report the correct number and types of
vessels
2 – Mostly accurate
Must report the correct number of vessels, but not type
3- Somewhat accurate
Report the number of vessels +/- 1D6, but must
report at least 3 vessels
4- Somewhat inaccurate
Report the number of vessels +/- 1D6, +/- 2
5 – Mostly inaccurate
Report the number of vessels +/- 1D10, +/- 4
6 -False
May report any number or type of vessels
Types
of vessels are reported as “Ironclads” or “Wooden Vessels.” No
other information need be given as to ship type.
Initial
Setup:
Union: Allowed to set up anywhere in the northwest corner of the map, within two hexes of the shoals in this area.
Confederate: Allowed to set up anywhere in the southern portion of the map, and no closer than 8 hexes from the nearest Union vessel.
The "base" Union starting forces for this game were the ironclads: Benton, Louisville, Carondelet, Cairo, and St. Louis.
The "base" Confederate starting forces for this game were the wooden ram vessels General Beauregard, General Bragg, General Sterling Price,General Earl Van Dorn, General M. Jeff Thompson, Colonel Lovell, General Sumter, and Little Rebel (flagship).
How my game started up:
The Ellet Ram fleet initially started with only the Mingo and Lioness. The Union player would be able to roll for more vessels on turn two.
What Ifs?
The Union player got the Ironclad Mound City in addition to the the base vessels at start.
The Union player also received the Timberclad Conestoga at start.
The Confederate fort was unoccupied.
There are no Confederate batteries on the bluff next to Memphis.
The Confederate player got to add the ironclad Manassas, and the wooden ram Stonewall Jackson to his initial forces.
General Thompson does not withdraw the
Confederate army gunners
The Union player was given the following intelligence about the Confederate fleet: "The are 10 vessels in the Confederate fleet." The Confederate player rolled a 2 on the Variable Intelligence table.
The Confederate player was given the following intelligence about the Union
fleet: "The are 7 vessels in the Union fleet." The Union player started with 9 vessels and then rolled a 3 on the Variable Intelligence table. The +/- 1D6 roll was a 2, so he decided to downgrade the report by 2 vessels. He could also have reported 11 vessels.
Saturday, February 20, 2021
The Battle of Plum Point -May 10, 1862
This was a miniatures battle re-fight of one of the larger "fleet" actions during the American Civil War. Union Captain Charles H. Davis and the Western Flotilla was working its way south down the Mississippi River with a force of seven Ironclads and some mortar rafts. Their objective was to capture the major Confederate city of Memphis. Fort Pillow was in their way on the east side of the river, and the mortar rafts were there to soften it up before the army arrived.
On the Confederate side Captain James E. Montgomery had a force of river steamers converted into rams to oppose them. This was the the "River Defense Fleet" and because of the timid behavior they displayed previously, the Union forces did not take them seriously. Bad idea.
I used the Yaquinto Ironclads game system for this, with some modifications. All ships are 1/1200 scale Spitheads, and I want to thank Phil for letting me use the article he created about the battle to design this scenario.
As the umpire, I decided that the Union forces would be set up randomly. Captain Davis had just taken command of the flotilla, and was not expecting to be attacked. On the day of the battle they were mostly concerned with getting the mortar rafts in position for the day's shelling of Fort Pillow, which would be just off the map down river on the photo above. No look-outs or picket ships had been posted.
Brown beads represent shore-lines, clear beads are shoals.
In addition to the random Union set up, I also instituted the following scenario rules in order to further represent the unprepared state of the Union flotilla :
All Union vessels next to shore hexes are considered anchored, without steam-up, and cannot move until they get steam up.
The Union player can designate any one vessel next to a shore hex as having steam up as an exception to the above (one of the vessels had just maneuvered a mortar raft into firing position before the battle started).
Any Union vessel not adjacent to to a shore hex is considered to have steam up, and has a movement allowance of 2. One of the possible starting locations I designated was in the middle of the river.
Only Union ships with steam up can fire on turns 1 and 2.
Starting on turn 2, Union ships without steam up can attempt to get steam up. They have to roll the value of their commander plus their crew quality or less on two dice. For example the Benton, the flagship, has Captain Davis on board (+4) and a crack crew (+2), so would have to roll a 6 or less to get steam up. Most of the rest of the ships in the flotilla have considerably lower values though.
Union vessels can add 3 to their steam up value if they have a Confederate vessel in sight.
On turns 4 and 5 the Union player can add 1 to his steam up value. Starting on turn 6 he can add 2.
The St. Louis was typical of the seven Union ironclads in this battle, and here is the ship sheet I created for it:
The Flagship of the Union flotilla, the Benton, was significantly larger and better armed than the rest of the ironclads.
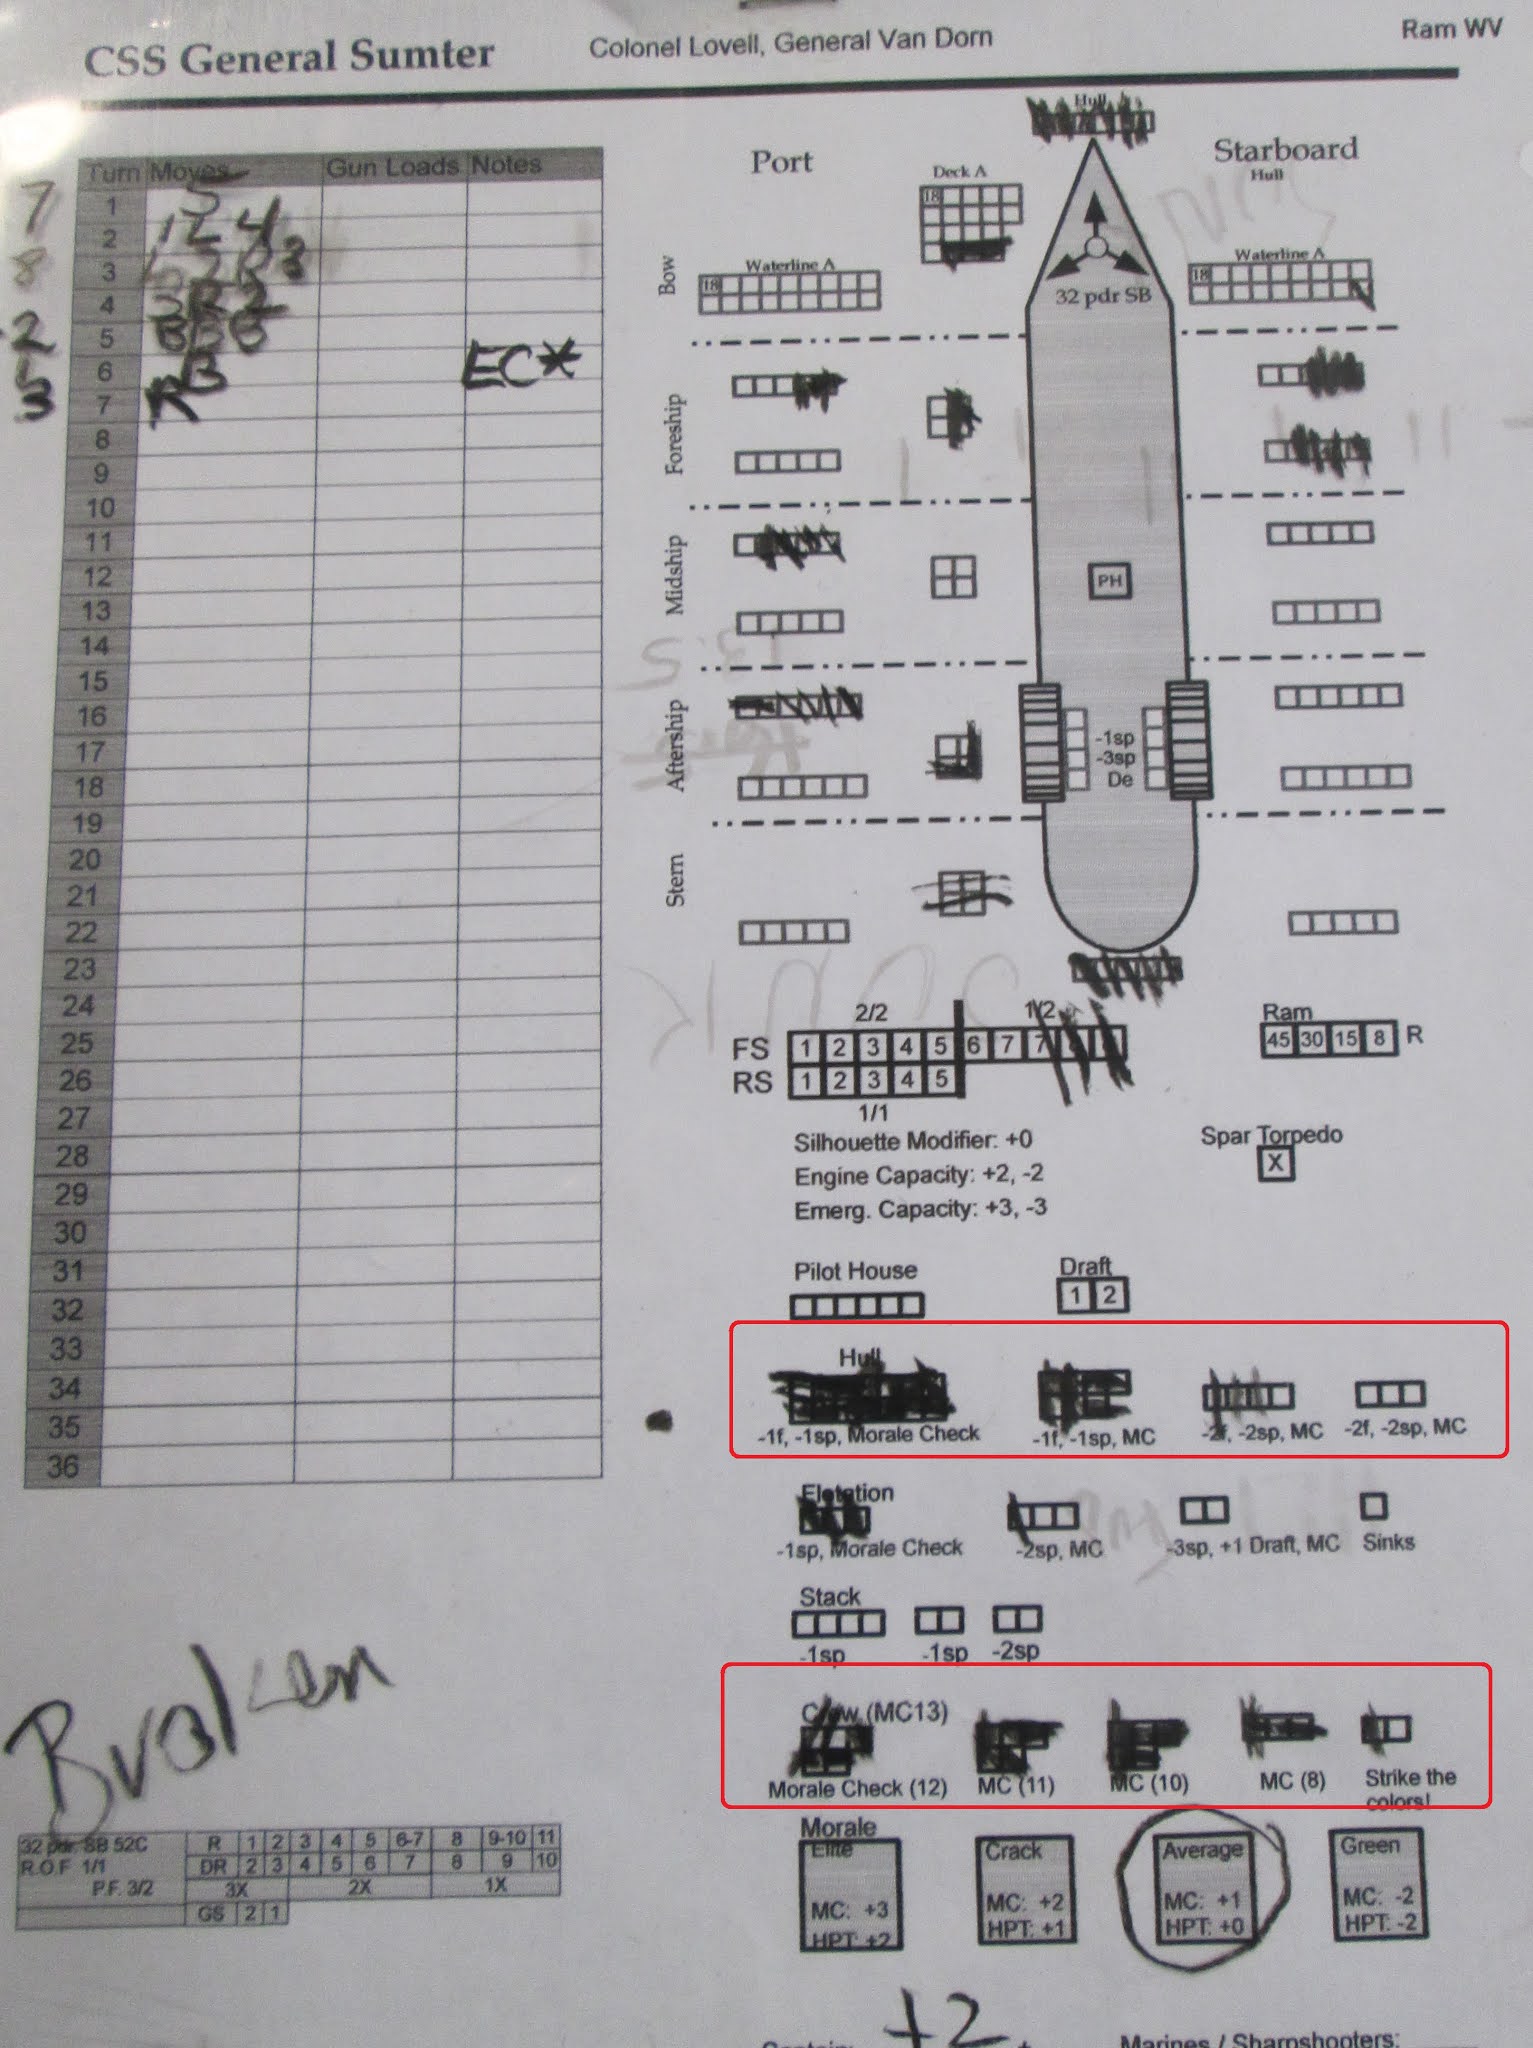
The Confederate River Defense Fleet on the other hand consisted of eight somewhat similar looking side-wheel steamer wooden vessels. This ship sheet for the CSS General Sumter is typical:
They were all heavily armored in the bow waterline (blue sections) and decks (green) so they could act as rams, and mounted only 1 or a few small guns. The flagship of the River Defense Fleet, the Little Rebel, was actually quite a bit smaller than the rest, but was still modified as a ram. The CSS Bragg on the other hand was significantly larger than the rest, having once been an ocean steamer.
None of them had significant hull armor however (the red sections), and that's the area that gets hit the most. This would be important in the coming battle.
If you are interested in down-loading these and other ship and fort sheets for the Yaquinto Ironclads game, they are on the Board Game Geek website (https://boardgamegeek.com/),
which is free to access once you register. Go to the Page for Yaquinto
Ironclads, and go to the files section. Look for the entry "Yaquinto
Ironclads Ship and Fort sheets" or "35 Iron Clad PDF Ship sheets (+ 4 forts)" to down load ship sheets.
Unlike the Union forces, the Confederates had been keeping a eye on the Union Flotilla, and were aware of their positions and daily habits. Because of this I allowed the Confederate player to deploy all his ships on the table within 4 hexes of the south map edge at any speed desired. The Confederates had no firing restrictions.
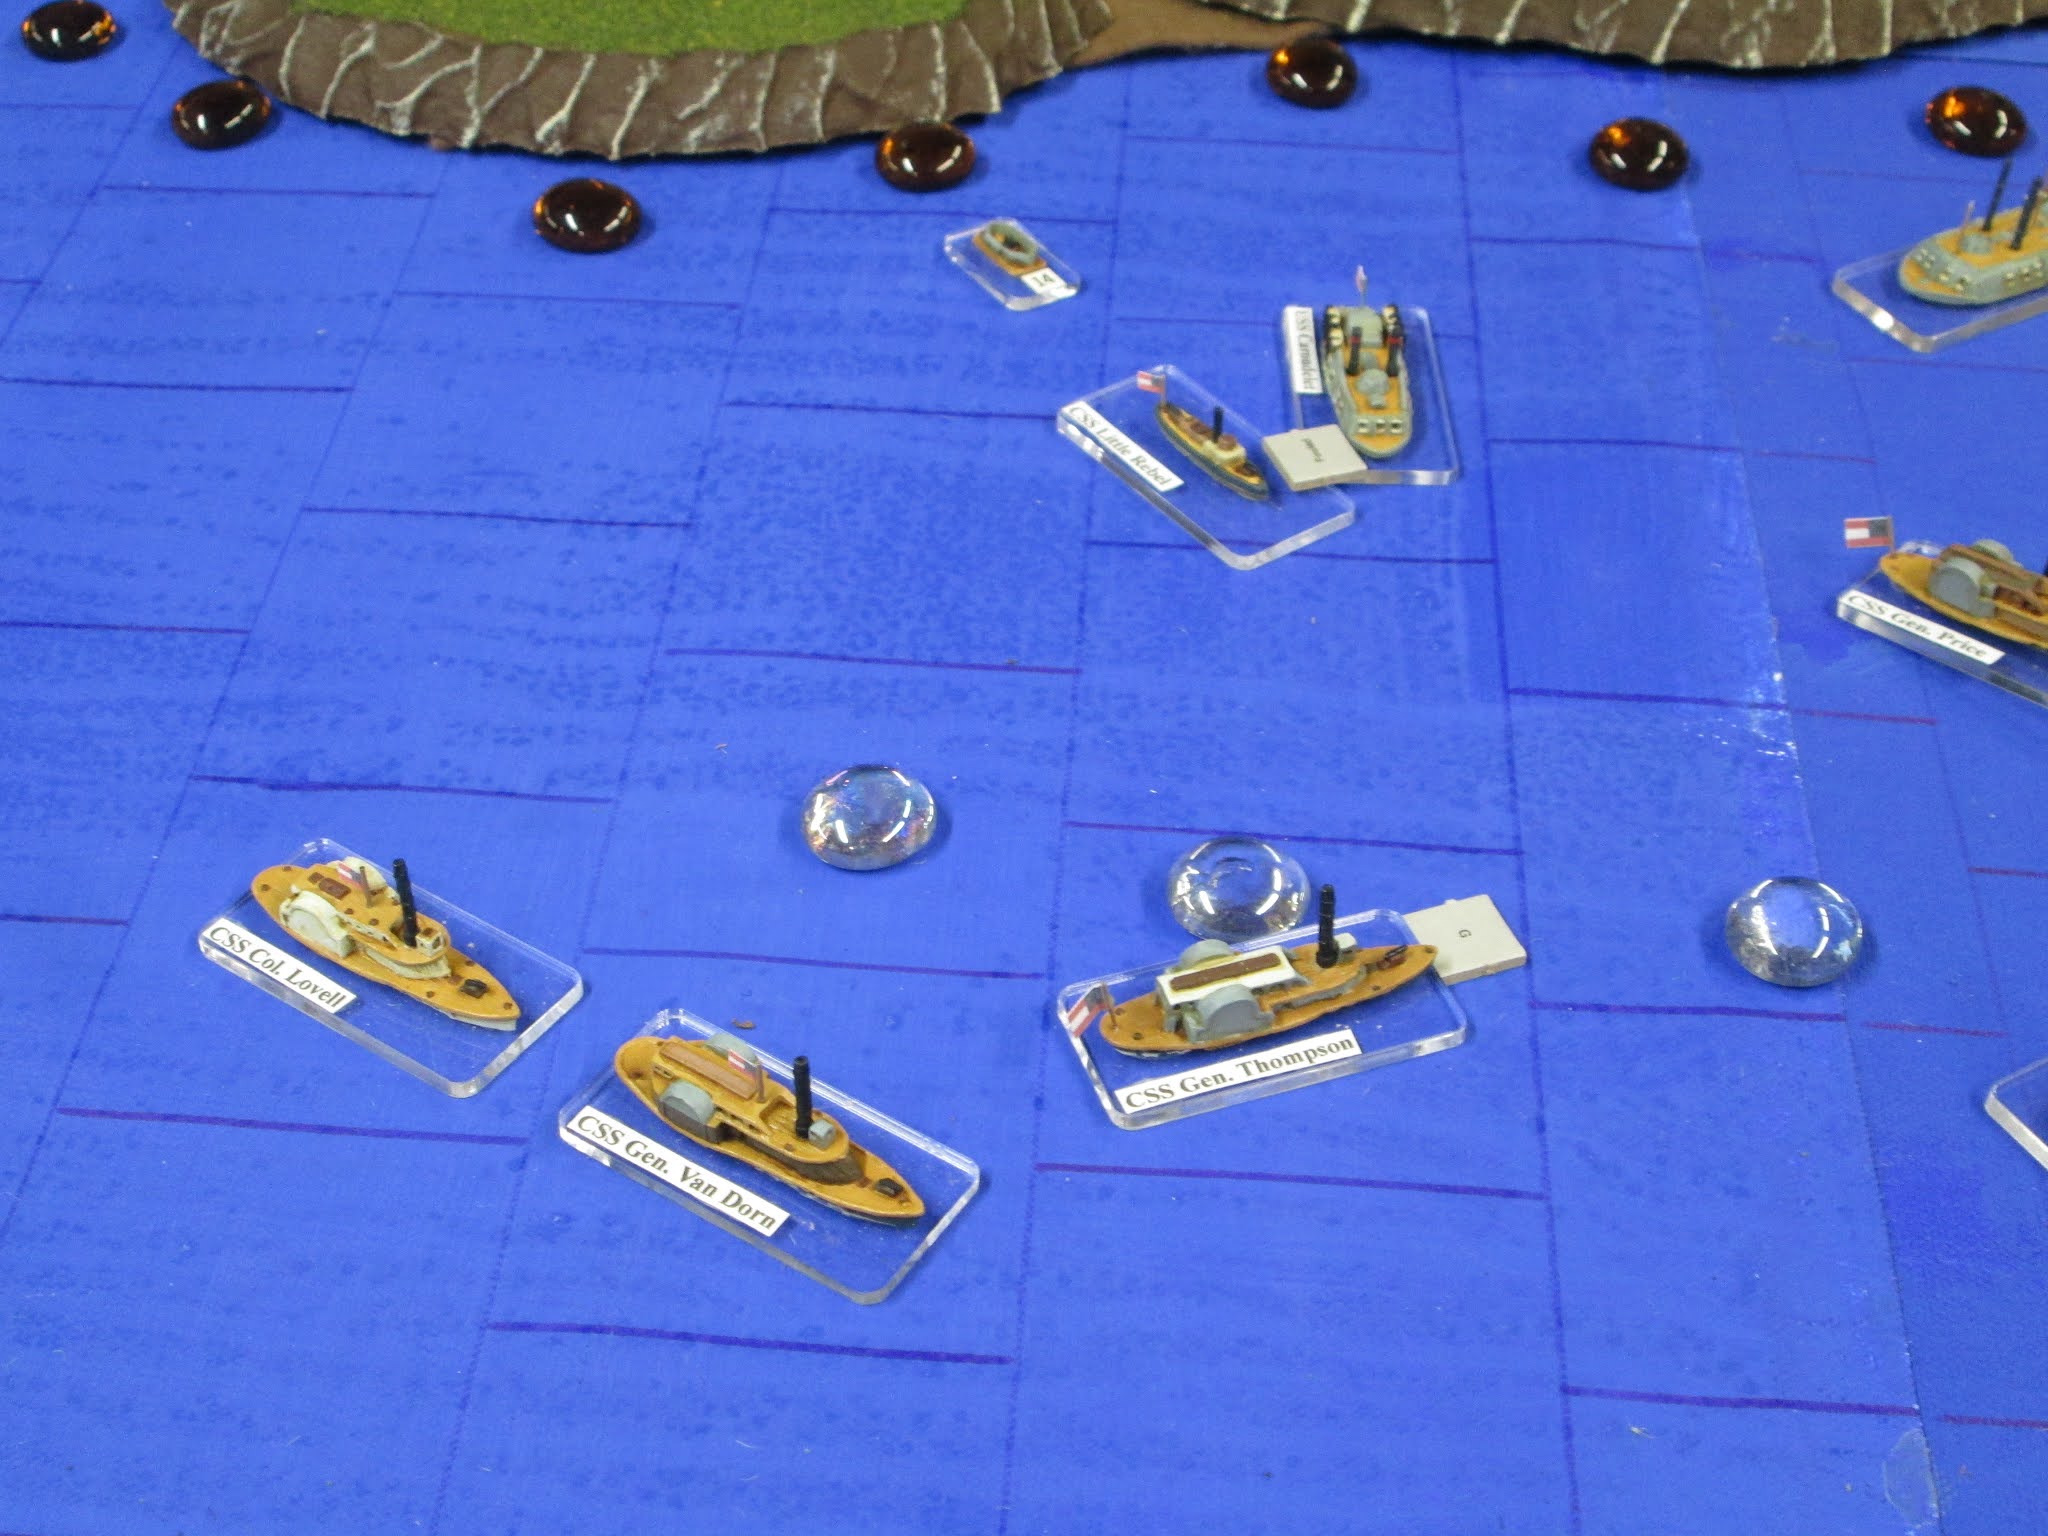
The Confederate player took advantage of this and deployed all his ships on the table in two adjacent columns. The Little Rebel led one column, while the largest ship, the Bragg, led the other:
The Confederate River Defense Fleet steams north against the current of the Mississippi River to do battle.
In the original battle the Confederate commander attacked in one long column, and allowed the faster vessels to go ahead of the slower ones. This really didn't make a lot of sense as it would mean fewer vessels attacking the Union vessels at one time, weakening the strength of the attack. If there was a time factor involved, this would have made sense, but the Confederates knew the Union Flotilla was unprepared and not expecting an attack, so rushing a few boats forward quickly served no purpose. By keeping his fleet compact and hitting all at once, the Confederate player showed much better tactical sense.
The Confederate player espoused the spirit of what he wanted from his ship captains before the game started: "RAM! You are here to ram Union ironclads. No captain can do wrong if he rams a Union ironclad. If you ram and sink an ironclad, find another and ram it! Ram as long as your ship can move. If you can't move any longer, fire your guns until you sink. No ship leaves this battle until the enemy vessels are underwater or captured. Ignore the mortar rafts until all ironclads have been sunk."
Had the original Confederate commander given such a pep talk, they might have done much better.
Looking north-west over the UnionWestern Flotilla
On turn one the Confederate force steamed at a speed they all could manage (8) in order to keep together. In the part of the river they started they were fighting against a 2 MP (movement point) current, so only managed 6 hexes on turn 1.
The square white marker at the top of the picture designates the speed and direction of the current. At top-left the 3 clear glass beads designate the position of a sand bar that was in the middle of the river.
The Confederate commander in Little Rebel led his column to port immediately to steer south of the sand bar, while the column with Bragg in the lead, steered straight to get to the north of the sand bar. The Bragg column might have waited a little long to make the turn to port to engage the Union vessels, but he wanted to have as much space as possible between the columns because there was always a possibility the ships in the River Defense Fleet might accidentally ram each other, as happened in the battle after this one.
On turn one... for the Union side not much happened. Carondelet made long range shots with its three bow 8" Dahlgrens at the Bragg, but all missed. Carondelet
backed water in the 1 MP current that was in this part of the river in
order to stay near and protect mortar raft #14 (right center in the
picture above). Benton had no targets visible at this point, and Cincinnati's guns were out of range.
Cincinnati,
being placed in the middle of the river was automatically
considered to have steam up. The Union player designated Carondelet as the one ship that could have steam up even though it was
next to the shore.
For turn 2 on the Union side, only the Benton managed to raise steam.
Benton was able to move forward 2 hexes with the help of the current. These Union ironclads had only a meager ability to accelerated or decelerate. If you check the ship sheets shown previously, you will see a value called "Engine Capacity." For the Union ironclads it is always +1, -1, meaning they can only accelerate or decelerate by 1 MP a turn.
The Confederate vessels on the other hand, being lighter, wooden vessels with good engines, all have a Engine Capacities of +2, -2, giving them an advantage. In the close confines of the Mississippi River however, this advantage is really only useful for running away.
Most ships also have an "Emergency Capacity" which allows them to exceed their normal engine capacity at the risk of doing serious damage to the vessel.
On turn two Little Rebel steered a course to ram the Carondelet. The Confederate commander followed his own recommendations by avoiding mortar raft #14, and headed for the ironclad instead. I allowed the Little Rebel to move through the hex containing the mortar raft without having to ram it or roll for fouling since the raft was a very small un-powered vessel and would have been tied up to the shore and out of the way.
Both Carondelet and Cincinnati blasted away at Little Rebel as it approached getting several penetrating waterline hits, as well as doing significant crew and hull damage. Penetrating waterline hits cause an automatic flotation hit. Loosing all your flotation is the quickest way to get sunk. Despite the damage it took coming in, Little Rebel managed to ram the Carondelet bow to bow, inflicting 50% flotation damage on the ironclad. The ships became fouled (stuck together) after this.
It may seem unrealistic that such a small boat as the Little Rebel cold cause so much damage to a larger vessel like the Carondelet, but at this point in the war these ironclads did not have uniformly good waterline armor. This was remedied later in the war.
Little Rebel slams into Carondelet (left) while the rest of the column tries to maneuver around them to find more targets. In the right distance the Bragg column maneuvers to go to the north of the sandbar.
Fouling was one of the main dangers for a ram vessel. If the target ship sinks while they are still fouled, the ramming ship can go down with it. This almost happened with the CSS Virginia and the CSS Albermarle ironclads after ramming a wooden ship.
The Benton fired its bow 9" Dahlgrens and 42 pdr Army rifle at the General Price, doing hull damage and knocking out its bow (and only) gun, a 32 pdr.
General Thompson slows down and veers to port to avoid running into the Bragg.
Because of the damage they suffered, both Carondelet and Little Rebel had to check morale at the end of the turn. Rebel passed its morale check, while Carondelet did not, and the crew were considered "broken." The affects of broken morale are that no guns can be fired, and the vessel has to try and leave the area a quickly as possible. If vessels haven't recovered from being broken after 3 turns, there is a chance they will abandon their ship, or surrender it.
Given that it was still fouled with the Little Rebel, there wasn't much the Carondelet could do about the running away part.
On turn 3 the St. Louis was able to get steam up and moved forward 2 hexes with the help of the current.
The Carondelet and Little Rebel drifted with the current one hex and the stern of the Carondelet rotated to starboard. Little Rebel pounded away with its 12 pdr pop-guns causing a little armor damage. Carondelet with its broken crew could not respond.
The General Thompson veered left to avoid running into Bragg, and in the process went aground on the sandbar. The Col. Lovell and Gen. Van Dorn, which had been behind Thompson slowed up to avoid hitting it.
Gen. Thompson run aground on the sand bar while Col. Lovell and Gen Van Dorn cruise by.
Bragg just missed ramming the St. Louis and unfortunately for the Bragg ended up right in front of it where the St. Louis' heaviest guns were. At that range they couldn't miss and didn't. The St. Louis' guns did some hull and crew damage, but the most devastating hit was to the Bragg's stern waterline that jammed the rudder hard to starboard.
Bragg
gets a bucket-full of iron from the St. Louis, while the General Price
rams the Cincinnati putting it out of action for the moment. The black markers mean that vessel will have to take a morale check at the end of the turn.
The General Price
rammed the Cincinnati bow to bow, inflicting 9 flotation hits, leaving it only one flotation box left before it sinks. Price took a flotation hit in the bargain. Flotation hits will affect your speed, and because Cincinnati lost 90% of it's flotation, it's speed was permanently reduced to 1. The two vessels did not become fouled with each other. Before it was rammed Cincinnati fired off in three directions at the Confederate vessels around it, doing significant damage.
Both General Beauregard and General Sumter steamed through the Union formation without managing to hit anything, although Benton managed to do some hull and crew damage to Sumter as it passed.
The fire from the Confederate vessels did only minor armor damage to their opponents.
General Sumter and Price both passed their morale checks, but Cincinnati did not, and given the condition it was in, it probably didn't matter anyway. The Carondelet on the other hand passed its check to regain morale and was now back in the battle.
Turn 4 - General Thompson rolled to un-ground itself and was successful. It did this going into reverse, which gives you a bonus to the roll. However that would mean being out of the battle longer.
Carondelet and Little Rebel managed to unfoul from each other.
Of the three Union ironclads that still had to raise steam, only Cairo was successful. Pittsburgh and Mound City were still anchored.
During the fire exchange the General Price was caught between the fire of three federal ironclads, and didn't fare well. It was still backing off from ramming Cincinnati, and was almost a stationary target. Fire from Benton, St. Louis, and Carondelet did great execution. Two different engine hits ensured it would go nowhere but down stream. It might have survived this, but the last hit it took was a magazine hit and the General Price exploded and sank.
General Price does the "ball of fire" thing, and is the first Confederate vessel to sink in the battle. Cincinnati could not join in with the shooting orgy on Price since its crew's morale was currently "broken." Fire by Litko.
Normally a wooden ship it allowed to remain afloat one turn for every remaining 10 hull points, but magazine hits are an exception, and the critical hit clearly states "ship sinks immediately."
General Price had obviously taken a pounding before the magazine explosion and would have been lucky to survive. Better to go out with a bang!
The General Bragg was in difficulties given its rudder hit, but was still in relatively good shape. Its was able to use its three guns, firing on the stern of the barely floating Cincinnati. Cincinnati was just one flotation hit away from sinking after being rammed by the General Price. It was the Bragg's smallest gun, a 12 pdr rifle that got a waterline penetration. Waterline penetrations cause an automatic flotation hit, so the Cincinnati began its not so slow trip to the bottom of the Mississippi. It would stay up one more turn before it sank because it still had 23 hull points left. Unlike wooden vessels, armored vessels can only stay afloat one turn for every 20 hull points left.
The Bragg didn't have long to enjoy its success. The Benton laid into it with a very effective broadside from its three 42 pdr Army Rifles and two 32 pdr smooth bores. One of the 42 pdrs got a boiler hit that caused an explosion, causing massive crew casualties and hull damage. Even worse it caused a level 4 fire (5 being the maximum). Fires will cause damage every turn until put out, and can get bigger if not extinguished. You have to allot crew factors to fight fires if you want to put them out, but this will take away from gun crews and engine crews.
During
the fire fighting phase the Bragg wasn't able to allot enough crew to
fighting the fire to make a difference, mostly because so many had
become casualties from the boiler explosion. The fire increased to a
level 5 fire. During the morale check phase the crew became broken,
sealing the Bragg's fate.
With only 5 crew factors left, Bragg had little chance of putting out a level 5 fire.
The Carondelet, having regained its morale was able to pummel the apparently fleeing Little Rebel. Actually the Little Rebel was trying to gain some room from the Carondelet so it could come back for another ramming attack. Little Rebel suffered extensive hull, flotation, and crew hits as Carondelet exacted its revenge...
Carondelet slams into Little Rebel with its bow 8" Dahlgrens, while mortar raft #14 looks on. The mortar rafts are unable to shoot at any target less than 6 hexes away, making them pretty useless in a battle like this.
The
Rebels had several ramming opportunities this turn. General Beauregard
steered for the still stationary Cairo off in the as yet quiet south-west corner of the battlefield...
Cairo's three bow 8" Dahlgrens caused significant damage to the Beauregard as it approached, destroying the waterline port foreship section, and inflicting three flotation hits, along with hull and crew hits.
The Beauregard's single gun, a 42 pdr on the bow made a very lucky penetrating waterline hit on the Cairo's bow. Since it penetrated the waterline, it caused a flotation hit. In addition, it made a lucky critical hit which inflicted 2 more flotation hits. So even before it rammed the Cairo, the Beauregard had destroyed 30% of the Cairo's flotation.
When the Beauregard rammed, it caused four more flotation hits, bring the flotation damage on the Cairo up to 70%. Beauregard suffered some minor hull damage due to the ramming.
Several factors are used to calculate the damage done in a ramming attack: the hull factors in the attacking vessel, attacking vessel speed relative to the defending vessel, and the strength of the ram compared to the waterline section hit. Hitting the enemy's bow sections can cause additional attacker damage.
The Beauregard was steaming against a 2 MP current at the time it hit Cairo, so its velocity was not as great as it might have been had it been steaming with the current, or even calm water. The extra velocity might have been enough to sink the Cairo.
The ships didn't foul after the ram.
General Sumter made for the
equally still Mound City...
Sumter, which already had significant damage, took more damage as it approached Mound City. By the time it made contact it had 50% hull and crew casualties, and 30% flotation hits.
Sumter unluckily hit Mound City in the midships section, the only waterline section on Mound City that had thick armor. Even with that it managed a lucky roll that inflicted 50% flotation damage on the Mound City. Sumter suffered no additional damage due to ramming, and the ships didn't foul.
Col. Lovell rammed the St. Louis bow to
bow...
Before it was able to connect, the Lovell had its bow and left foreship sections destroyed by the St. Louis' bow 8" Dahlgrens. It also took hull and crew hits. The St. Louis already had a flotation hit, and the Lovell inflicted 8 more on it, bringing the St. Louis' flotation damage to 90%. The ships did not foul each other.
As with the other ships, once it takes enough flotation damage its "draft" level increases,meaning the vessel is sinking lower in the water, making it more likely it will run aground in shallow areas. The St. Louis started with a draft of 1, but because of the flotation damage now is a 2. The flotation damage also reduced the speed of the St. Louis from 4 to 2.
Because of all the damage done on this turn, about half the ships had to make morale checks. Only the Little Rebel and the General Bragg failed their morale checks, and given their level of damage, would probably not be able to recover.
Turn 5 - Despite being rammed, or maybe because of being rammed, the Mound City was still unable to raise steam, just missing the roll by 1. Pittsburgh missed by more, so also did not raise steam. If it seems unlikely that any of the Union ironclads could not have joined the battle yet, the history of the actual battle was similar. In the actual battle three of the Union Ironclads joined the battle late, and contributed very little.
Little Rebel's morale had broken the previous turn, and now could do nothing but flee the battlefield. It was increasing the gap between it and its previous opponent, the Carondelet, but it wasn't enough....
Little Rebel flees the battlefield, taken the fleet admiral with it. It doesn't get far...
Carondelet's starboard broadside of two 42 pdr Army Rifles and two 32 pdr smoothbores managed to get a waterline penetration hit on the Little Rebel, taking the last two flotation boxes it had left. Little Rebel had just enough hull boxes left to stay afloat one more turn, so turn 6 would probably see it heading for the shallows.
The Confederate flagship Little Rebel has obviously taken a pounding. All flotation gone, as well as most of the hull and crew factors. Because of the flotation damage, it has sunk to a deeper draft of 2 from the original 1.
Little Rebel runs but cannot escape. Carondelet, in the middle distance has just given Little Rebel her paybacks for the ramming. The gray area around the bridge of the Little Rebel represents the compressed cotton the Rebels (and sometimes the Union) used on their ships for extra armor. It was somewhat effective, but had the unfortunate side effect of sometimes catching fire. In the upper left General Price and Bragg burn.
The previously untouched General Thompson was just managing to get some forward momentum after backing off the sandbar, when Carondelet's port broadside bashed into it, inflicting 50% flotation hits and significant hull and crew casualties.
St. Louis' port broadside fired into the also relatively untouched Col. Lovell, inflicting enough crew hits to force a morale check at the end of the turn.
The Benton made a turn to port so it could get closer to some of the Rebel ships, and was able to hit the General Van Dorn with a couple of it's four forward firing bow guns, a 9" Dahlgren smoothbore and a 42 pdr Army rifle. Although Van Dorn had not taken a lot of hits up to this point, by the end of the turn a quarter of its crew were casualties.
Van Dorn approaches the Union Flagship Benton, which could lead to a
ramming opportunity next turn. All ships in the game have a ramming
strength, but unless the ship was designed specifically to ram, it's
usually not very great. The Benton, the largest and best built ship on
the Union side, only has a ram strength of 18, while the Van Dorn,
specifically altered as a ramming vessel has a 45.
The wreck of the burning General Price settles into the Mississippi , while the sinking Cincinnati manages to drift into the sand bank before settling to the bottom. Where a vessel sank is important, for as long as they didn't burn and explode, they could be repaired if they didn't sink in deep water. One Union ironclad sank twice during the war, and was repaired both times and put back into action.
General Sumter backed away from the Mound City after ramming it, assisted by the the 2 MP current in this part of the river. It backed up in a blind spot that was between the bow and broadsides gun arcs of the Mound City, and received no "revenge fire" as had the other Confederate vessels after they rammed.
Gen. Sumter manages not to get a close range pummeling from its victim, the Mound City. Top center the Bragg finally explodes from the runaway fire. Pittsburgh in the upper left is still sleeping despite all the noise. Maybe the wind was in the wrong direction, or perhaps a little too much late night whiskey...
The Cairo and the General Beauregard were pretty much stuck in place by the 2 MP current for this turn. The Cairo's 2 MP speed forward negated, and the Beauregard's 2 MP reverse speed just cancelling it out. This was not so bad for Cairo, as it made Beauregard an excellent target for the Cairo's forward 8" Dahlgrens. Beauregard's only gun, the bow mounted 42 pdr, was really no match for the Cairo's casemate armor. Remarkably the Cairo's guns did only superficial damage to Beauregard despite the range. Beauregard needed only one more lucky waterline hit on the Cairo to sink it. It got the waterline hit, but it didn't penetrate this time and did only minimal damage.
The battle so far:
Both sides have taken serious losses but still have ships capable of fighting......
The Union Western Flotilla has lost the Cincinnati, although it could be recovered and repaired if the Union side wins the battle. The St. Louis and Cairo are both close to sinking, and another ram on either would probably sink them. Their morale remains un-broken however, and they are still capable of fighting. Carondelet and Mound City both have 50% flotation hits, but are likewise still capable of fighting. The Flagship, the Benton, and the Pittsburgh are both in very good shape. The Pittsburgh has yet to raise steam though.
On the Confederate side the River Defense Fleet is probably in worse condition, but still capable of inflicting serious damage, especially if they can get some more ramming in. The flagship, the Little Rebel has been sunk. The Confederate's largest and most potent vessel, the General Bragg has exploded, as has the General Price. The other five vessels all have damage that could be considered moderate bordering on severe. The Col. Lovell's morale is broken and given its green crew and lack-luster commander value, may not recover. Ships with broken morale have to leave the battle area as quickly as possible.
Turn 6 -Both Pittsburgh and Mound City manage to get steam up....
With the aid of the current the Pittsburgh manages to get well into the middle of the Mississippi (Engine Capacity of +1 plus the 2 MP current).
The Pittsburgh will soon have some targets. From their location the mortar rafts are finding it hard to acquire any in the swirling maelstrom of battle.
General Sumter successfully uses its Emergency Engine capacity of +3 to slow down and counteract its rearward movement. Its commander would like to get some forward momentum in order to ram the Mound City one more time and hopefully put it away. However with the river current of 2 MPs, it still backs up a hex. Sumter gets lucky and doesn't suffer engine damage from using Emergency Engine capacity.
The General Van Dorn targeted the Benton for ramming, approaching from port broadside of the Benton. Benton fired into the bow of the Van Dorn before it hit, inflicting hull and crew casualties. This was enough damage to cause a morale check at the end of the turn.
The Van Dorn hit the Benton in the port foreship at a speed of 7, which was a pretty good speed to inflict damage. It would have been 8, but the Van Dorn was steaming against the 1 MP cross-current at this part of the river.
The Benton was a larger class vessel than the other Union Ironclads, and unlike them had fairly good waterline armor. In addition the Van Dorn already had over 50% hull hits. The more intact hull you have when you ram, the more damage you do.
As it was the Van Dorn inflicted 25% flotation damage on the Benton (3 boxes), which wasn't bad given the circumstances. Van Dorn took ram damage from this (1 box) reducing its ram strength from 45 to 30. The vessels did not get fouled.
Meanwhile the Cairo and the General Beauregard continued their private battle in the southwest portion of the battlefield.
Beauregard's attempt to back away from the Cairo in order to get in another ram was being frustrated by the 2 MP current it was struggling against.
The Cairo on the other hand could go nowhere despite raising steam. The ram hit it had received from the Beauregard caused enough flotation damage to also give the Cairo 3 speed hits, reducing it maximum speed from 5 to 2 MPs. This was the same speed as the current flowing from the north.
The commander of the Cairo stated he was dropping the bow anchor back in the water, so would be facing up-stream.
Beauregard's bow 42 pdr spoke one last time before being silenced by Cairo's guns. It hit the Cairo's waterline, and there was temporary jubilation at the hope of another waterline penetration that might sink the Cairo. It was not to be however as it did not penetrate.
The Pittsburgh finally managed to get into the battle, and used its port broadside guns in relatively long range shooting at the General Sumter.
Only one of Pittsburgh's four guns hit, doing minimal damage.
Mound City was trying to close with the Sumter to frustrate a second ramming attempt, but its maximum speed was also reduced to 2 MPs due to ramming, and it was fighting against a 1 MP cross-current, reducing its actual speed to 1 MP.
Mound City could still fire, and its bow 8" Dahlgrens inflicted more crew and hull casualties on the Sumter. By the end of the turn Sumter had about 60% hull and crew casualties, as well as 25% flotation damage.
In the north-east part of the battlefield another drama was going on. The Col. Lovell had failed its morale check on the previous turn (became "broken"), and was required to leave the area by the quickest possible means, and could not fire or attack in any way until recovering from the broken condition. This would require Lovell to steam south, the way the River Defense Fleet came from. This would mean reversing speed as fast as possible.
Unfortunately for the Lovell, the General Thompson was right behind it. Thompson tried to engage Emergency Engine capacity in order to get out of the way of the fleeing Lovell, but the roll went bad and Emergency Engine capacity was not available. Lovell backed into Thompson and received 3 hull hits because of it. Thompson took two hull and a flotation hit. The worst part of the collision was this reduced their speeds to zero right in front of two of the Union ironclads. At least the vessels didn't foul.
Carondelet's bow 8" Dahlgrens blasted into the side of the Thompson, causing 60% hull and crew casualties, and 75% flotation hits. The accumulated damage reduced the ship's maximum speed from 8 to 3. The damage would force a morale check at the end of the turn.
St. Louis in turn blasted the Col. Lovell with its slightly less effective port broadside guns. They were still good enough to get the hull damage up to 60%, and the crew casualties to 50% on the Lovell.
The Confederate flagship settles to the bottom of the shallows.
Only the Confederate vessels need to make morale checks at the end of the turn, and all passed, including the Lovell. This meant the Lovell was back in the fight, although in a poor tactical situation.
Turn 7 - Battle conclusion....
The Confederate player realized he needed to do something drastic in order to save the situation. Both the General Thompson and Col. Lovell were near two damaged Union ironclads, and if they could just get in one more ram, they might sink.
Both Thompson and Lovell attempted to use emergency engine capacity in order to gets some momentum for a ramming attack, but both rolled "Not available." Neither was able to get in a ramming attack because of this.
Carondelet fired into the Thompson at point blank range with its three bow 8" Dahlgrens, causing massive destruction. Thompson's crew and flotation values were both reduced to zero, so it struck its colors as it sunk into the Mississippi. With only 3 hull points left, it was judged not to be able to stay afloat another turn.
The St. Louis fired its weaker port broadsides into the Col. Lovell, and managed to knock out the Lovell's only gun, the bow 32 pdr. The damage also brought the Lovell's crew and hull damage to 75%.
Before it was knocked out the Lovell's bow 32 pdr managed to get a waterline hit on the St. Louis. Only one more waterline penetration would have been needed to sink the St. Louis, but the round did not penetrate.
Over on the other side of the battle the Pittsburgh managed to redeem itself for its late entry into the battle and previous poor shooting. It achieved a unexpected couple of damaging long-range (relatively) hits on the Beauregard's stern waterline.
The initial waterline penetration caused an automatic flotation hit, and then a critical hit caused two more flotation hits. When Pittsburgh was done, Beauregard was at 75% flotation damage and down to a speed of 4 from 8.
Cairo also lit into Beauregard, using it's starboard battery of two 42 pdr Army Rifles and two 32 pdr smooth bores. On the first shot the Cairo got an engine hit on the Beauregard, taking away all engine power for 4 turns, and permanently reducing the Beauregard's speed to 1.
Given that it had a 2 MP current pushing it south, the Beauregard would soon be driven ashore. It was a moot point anyway, as the subsequent shots from the Cairo caused enough hull damage to also inflict another flotation hit, which was all it had left. It had enough hull points to stay afloat another turn.
The Benton unleashed its five port broadside guns on the Van Dorn, exacting revenge for the ramming. By the time its three 42 pdr Army rifles and two 32 pdr smooth-bores finished, Van Dorn had 80% hull, 60% crew, and over 50% flotation damage. Its speed was reduced to 6. Benton also knocked out Van Dorn's one and only gun. It also had to make a morale check a the end of the turn.
Mound City fired into the General Sumter inflicting 80% hull damage and 90% crew casualties (1 crew box left). There wouldn't be enough crew to man the engines effectively after this turn, and the ships maximum speed would be reduced to 3 MPs. It had to make a morale check a the end of the turn.
The Sumter managed to hit the Mound City's pilot house with its bow 32 pdr. Although it didn't penetrate, it did cause the Mound City to maintain a straight course for three turns at half speed. It would have been a useful hit earlier in the game, but now....
At the end of the turn the three surviving Confederate ships from the once proud River Defense Fleet had to check morale. All failed and were considered "Broken". Given the condition of their ships, it was decided to end the game and declare it a Union victory, although hard won.
Summary: The Confederate vessels fought hard, but once they rammed they were pretty much helpless against the better armed and armored Union Ironclads. If they didn't sink an ironclad with the initial ramming, and none did, they were stopped at point-blank, "can't miss" range next to an ironclad. This was a design flaw. Had the forward hulls of the River Defense Fleet vessels been armored, they wouldn't have received such a pounding and might have lasted long enough to ram again.
The total crew casualties really tells the story. All eight Confederate ships had 20 crew points each more or less for about 160 crew points. The average crew loss for their ships was 80%, or about 124 crew points. The total Union crew loss for all ships combined was 7 crew points. Even Cincinnati which was sunk lost no crew. If this seems hard to believe, the Cairo was sunk later in the war when it struck two mines. Although the ship was a total loss because of where it sank, there were no casualties.
All of the Union ironclads would have been
repairable. Even the Cincinnati would have been salvageable since it
sank on the sand bank. The strategic results of the battle probably would have been to slow up the Union advance down the Mississippi. With only two ironclads available until the rest were repaired, Captain Davis couldn't afford to be too aggressive.
An interesting "what-if" would be if the Confederates had had more ships available. Another wave of ram capable ships after the first would have caught the disorganized Union fleet at a disadvantage, and probably sunk several of the already damaged ones. And such an additional wave was at one time available in the form of Confederate Commodore Hollin's squadron. His vessels were at Memphis at one point and included the ironclad ram Mananas, as well as several other ram vessels. He took them south to New Orleans well before this battle, where they met their doom at the battle of New Orleans.
Thanks for reading my battle blog. The next battle will probably be the Battle of Memphis, where both sides used wooden ram vessels.....